TrendTex Fabrics LogoTrendTex Fabrics LogoTrendTex Fabrics LogoTrendTex Fabrics Logo
| Home

  • My Account
  • Customer Service
  • Products
    • Fabric
    • Precuts
    • Maple Precuts
    • Batting
    • Kits
    • Patterns
    • Fireside
    • Notions
    • Clearance
  • Free Patterns
  • Catalogues
  • Inspiration
    • Articles
    • Events
  • Clearance
Stocking by the fireplace
Christmas Stocking Tutorial with Shannon Cuddle Fabric
October 26, 2022
Hexie Pincushion Tutorial
Hexie Pincushion How-To
December 5, 2022
  • Articles
  • Projects & Inspiration
  • Drawstring Bag Tutorial

Drawstring Bag Tutorial

November 4, 2022
Drawstring Bag

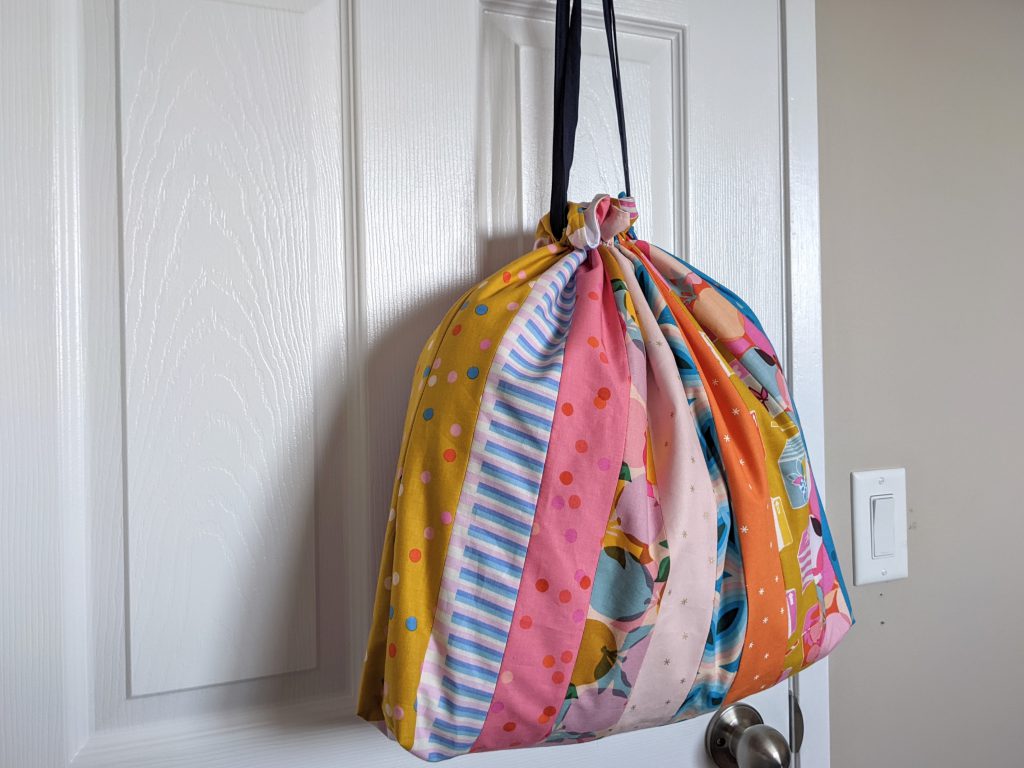
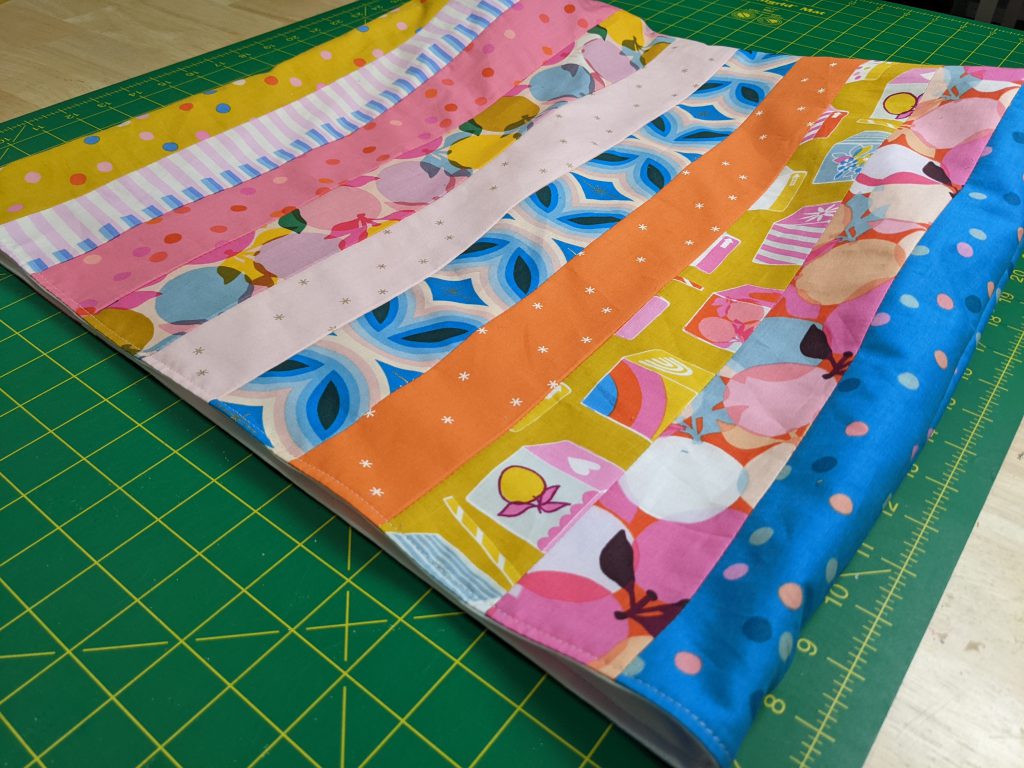
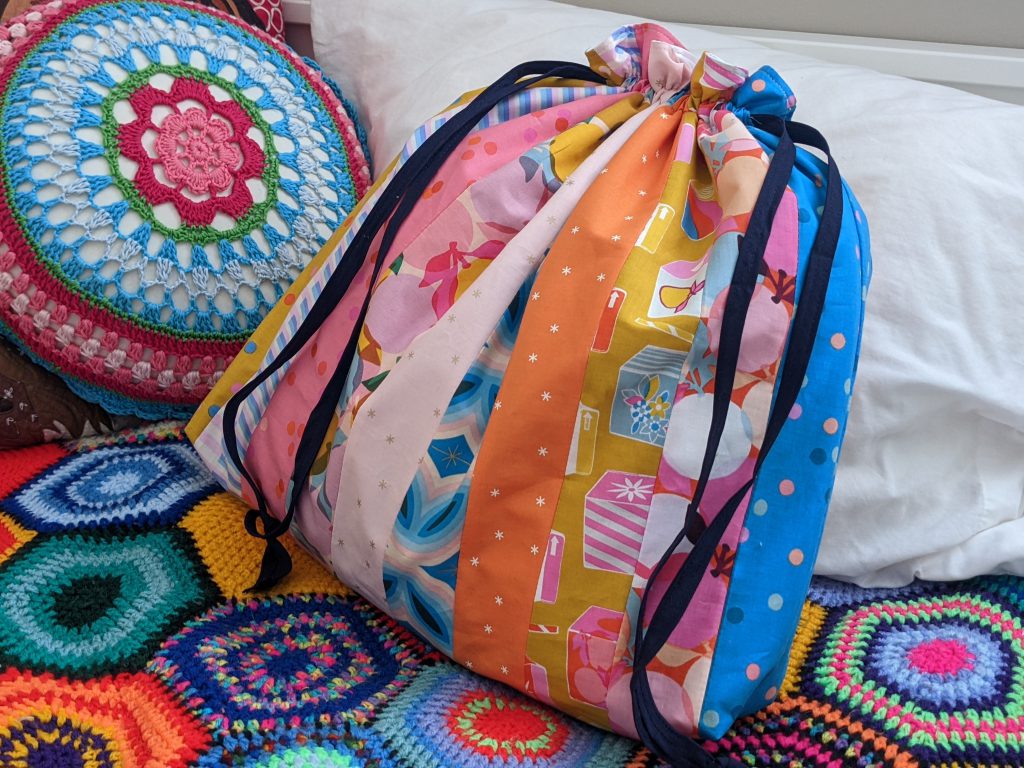
If you have some spare jelly roll strips, you can make this useful drawstring bag – great for containing a knitting project or a few toys. Or, line it with a waterproof fabric to use as a wet bag for kids’ swimming gear or baby laundry.

Finished Size:  Approx. 19 ½” x 19 ½” x 3″ Difficulty:  Easy
Time to make: 2 1/2 hours

You can make two drawstring bags from just one junior jelly roll plus lining fabric!

Seam allowances are ¼” unless stated otherwise.

Here’s what you’ll need:

  • Sewing machine
  • 10 jelly roll strips
  • 5/8m lining fabric
  • 2 3/4m of ½” bias tape or ribbon
  • Cutting tools: rotary cutter, mat and ruler
  • Washable fabric marker
  • Wonder clips or pins
  • Drawstring threader (optional –  you can also use a safety pin if you don’t mind going a little slower)
  • Fray Check Liquid Seam Sealant (optional)

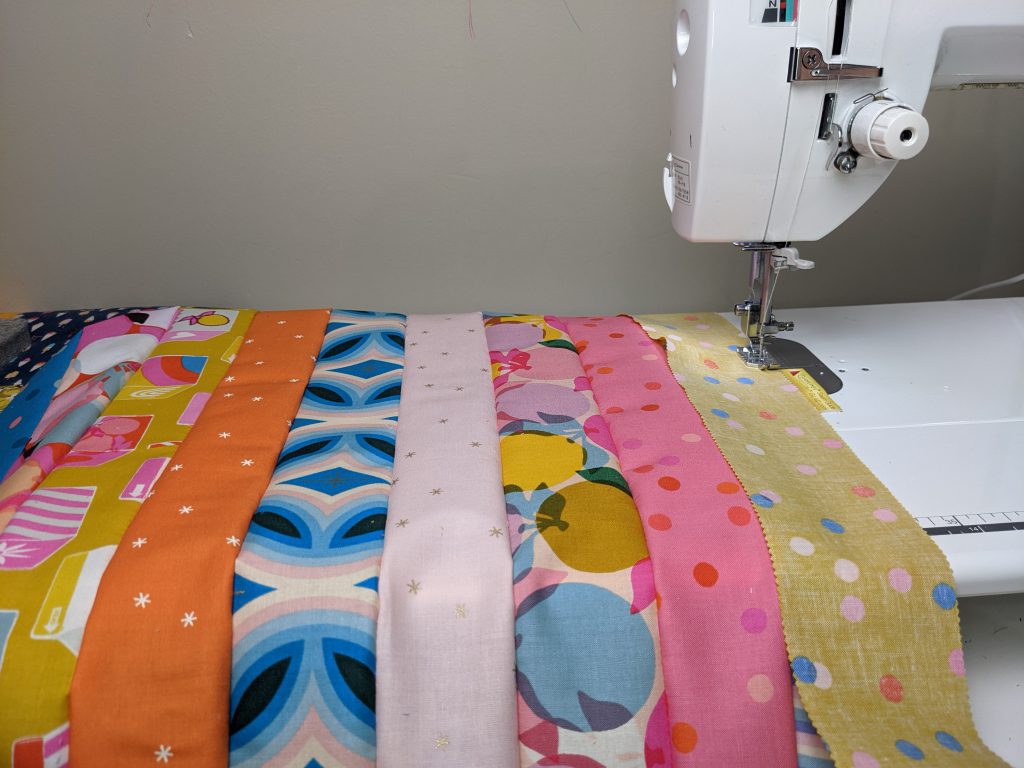
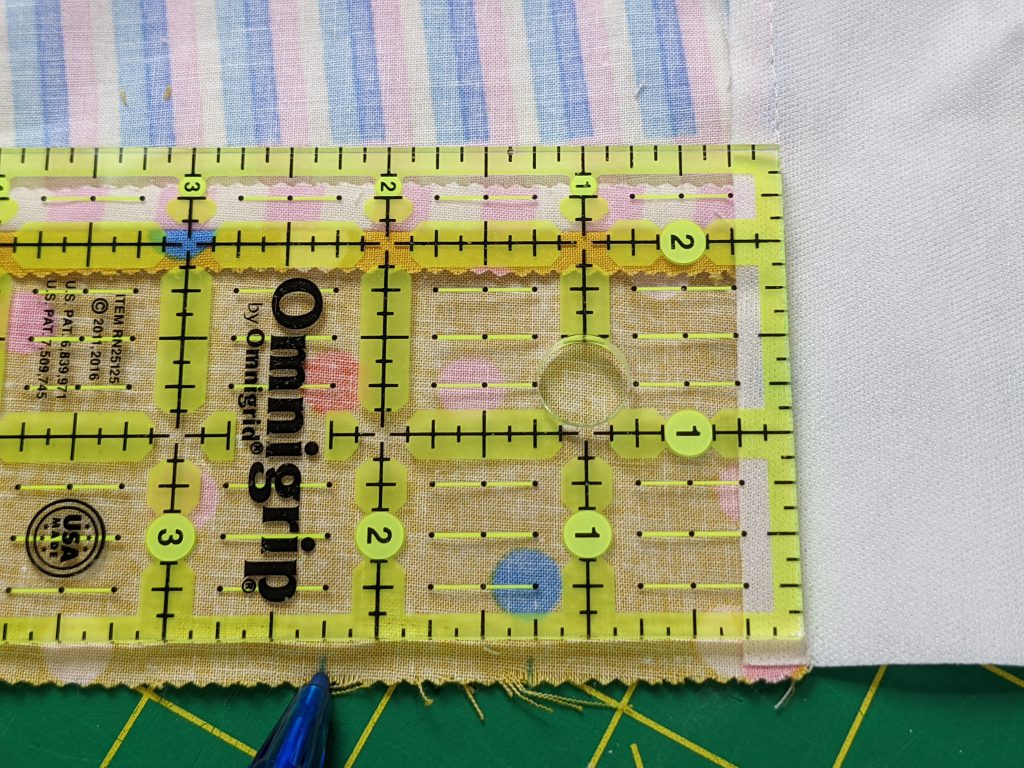
Sew the jelly roll strips together along the long edges. Press the seams open. Trim this panel to 40″ wide. The height will be 20 ½”.

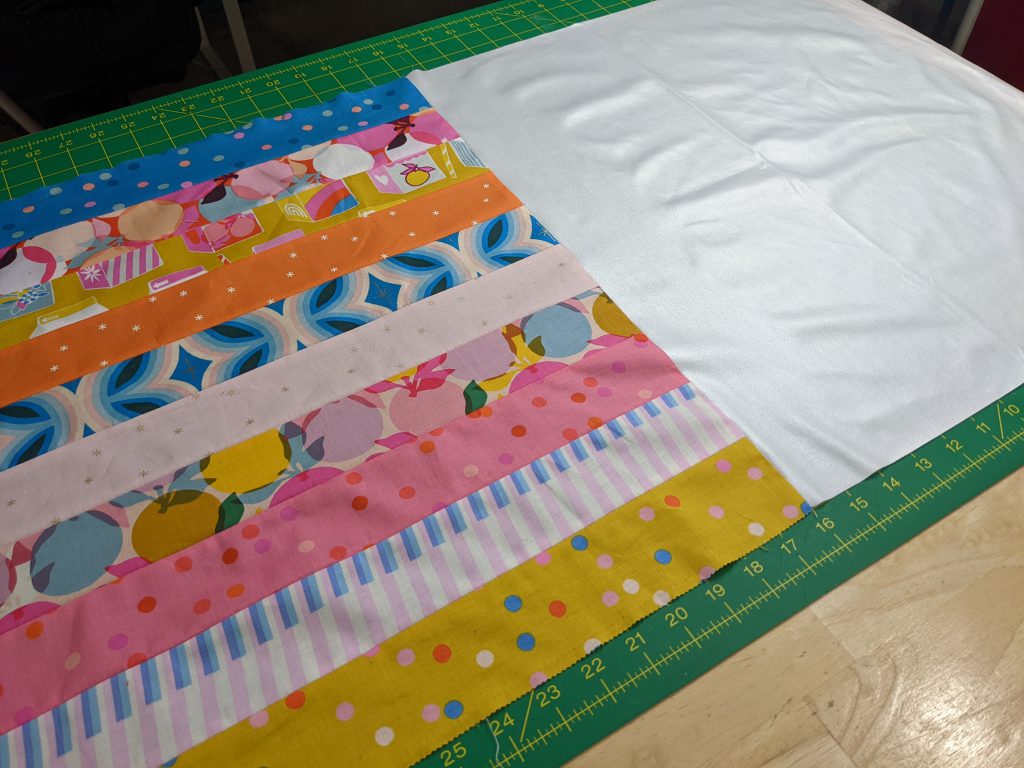
Cut two pieces of lining fabric to 20″ x 20 ½”. Sew one to each end of the jelly roll panel. If you’re using waterproof fabric for the lining, be careful when you press this seam. You’ll need a pressing cloth and a lower temperature on your iron. Press toward the exterior fabric.

Fold the exterior panel for your drawstring bag

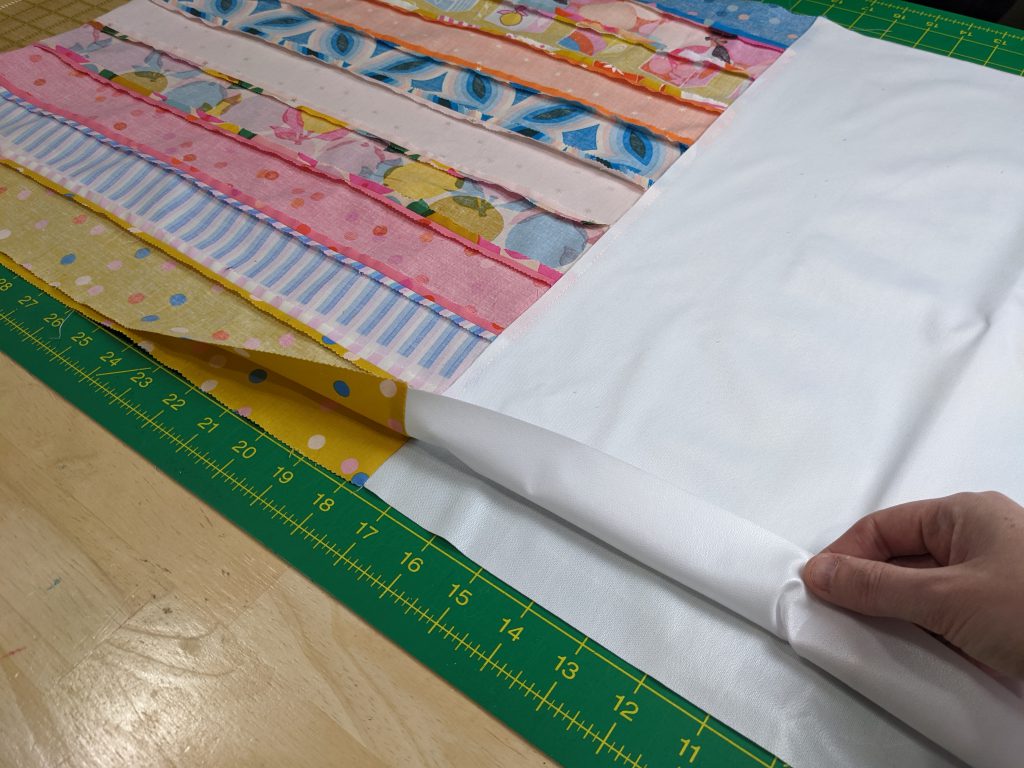
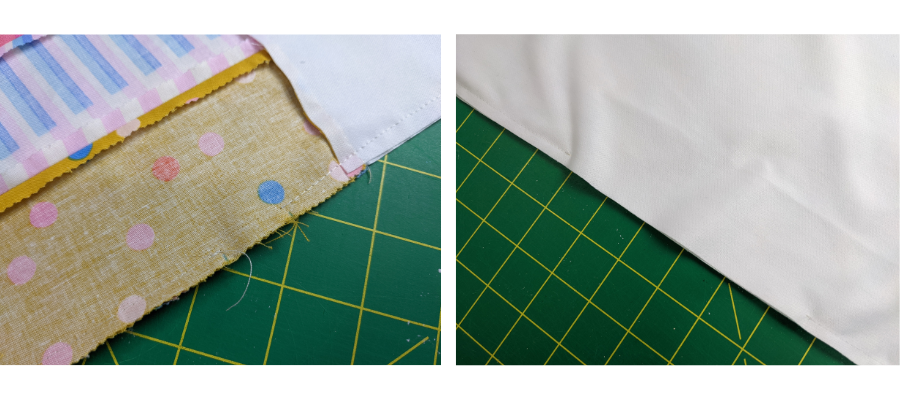
Fold the exterior panel in half, right sides together, bringing the two lining panels together. Match the seams and pin or clip.

Measure 1 ¼” into the exterior fabric from the seam line and mark at the edge of the fabric. Make a second marking 1″ from that one, or 2 ¼” from the seam line. Repeat on the other side.

Sew around the three raw edges, backstitching and leaving a gap between the markings – and leaving a few inches at the bottom of the lining panel for turning through later.

Fold the corners of your drawstring bag

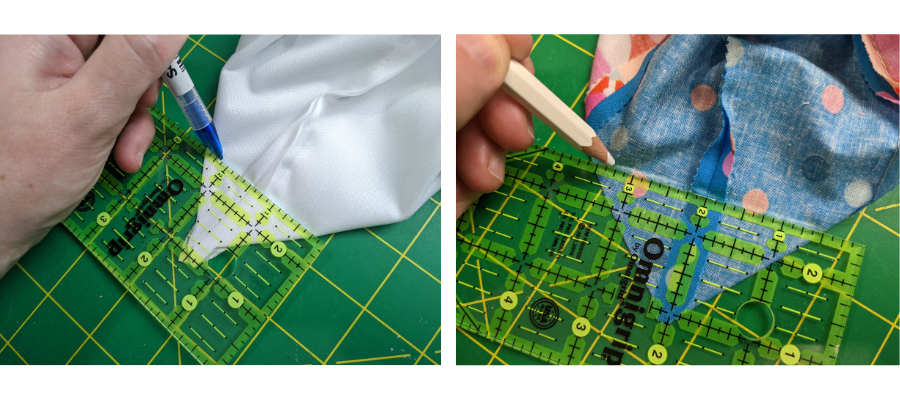
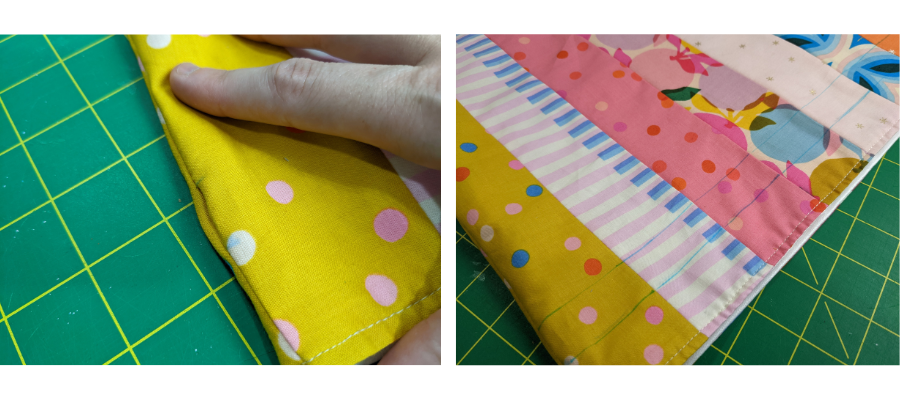
Fold the corners so the seam runs down the centre. Measure 1 ½” from that point and draw across with your ruler. Pin or clip. Repeat for all four corners.

Trim the excess

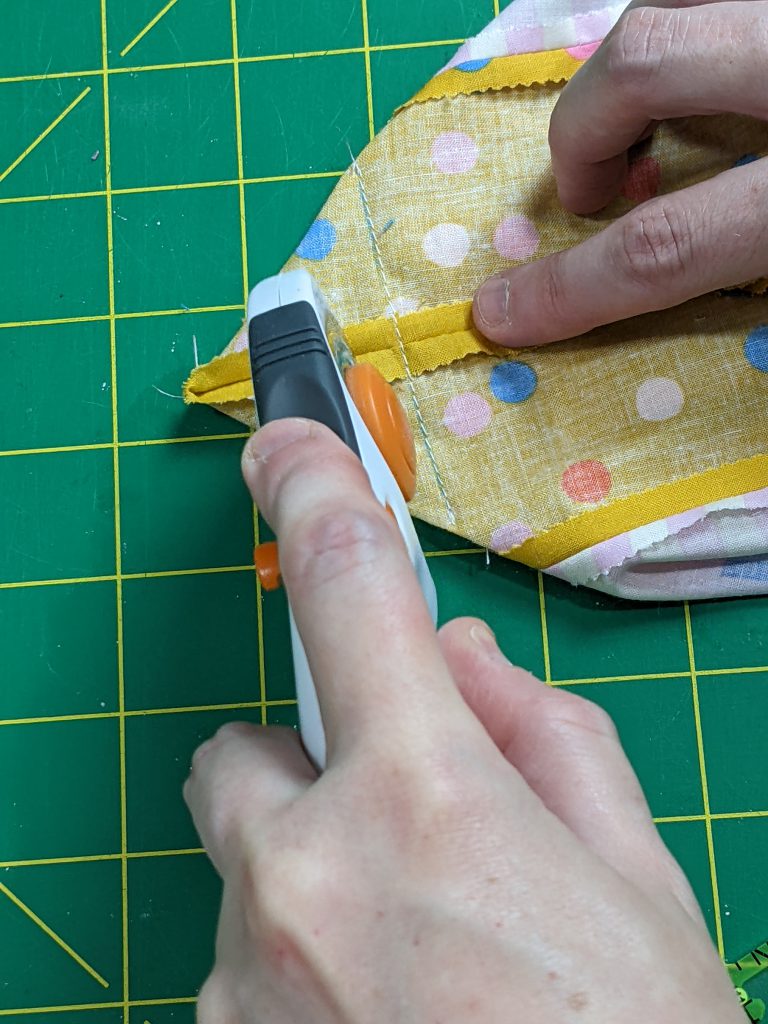
Sew along the lines you made and trim off the excess.

Turn the drawstring bag right side out

Turn the bag right side out through the hole in the lining, pushing out the corners. Press and topstitch ⅛” around the opening of the bag.

You can now sew up the lining hole by hand or with your machine.

Mark the small openings with a fabric marker at both sides. Using a ruler, join them up. Repeat for the other side of the bag.

Sew along the line to make your drawstring bag

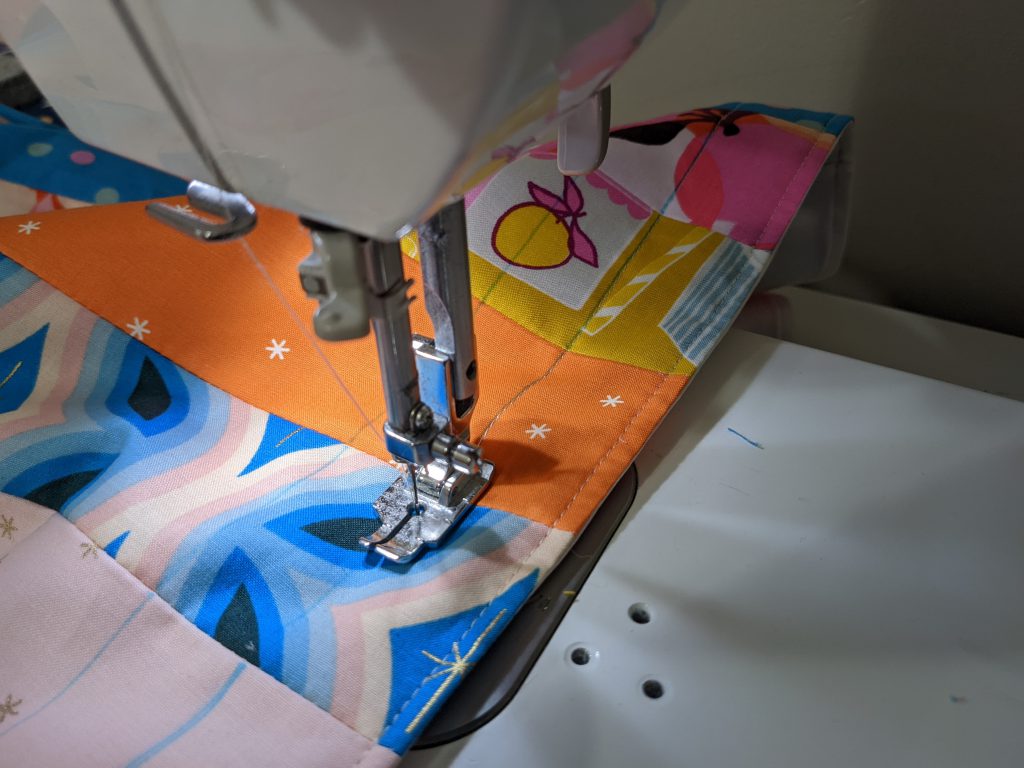
Sew along the lines, around the whole circumference of the bag.

Remove the marking with water

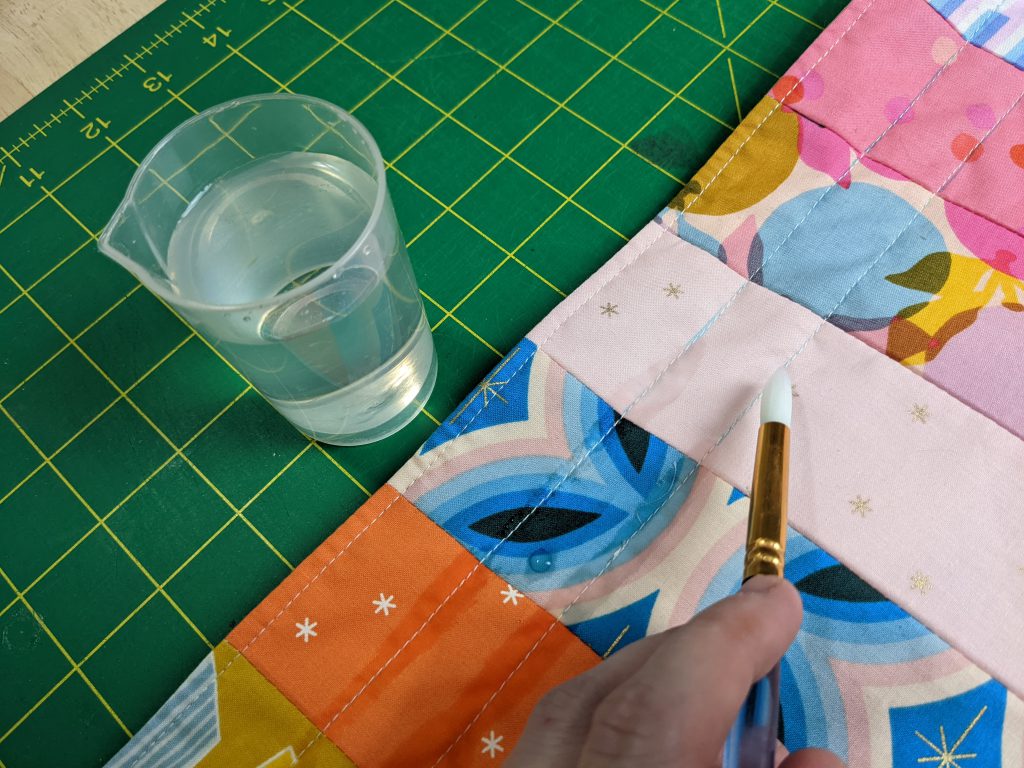
You can now remove the markings with water. You may need to leave it to dry for a short while, or press with the iron to speed things up.

Sew the strings

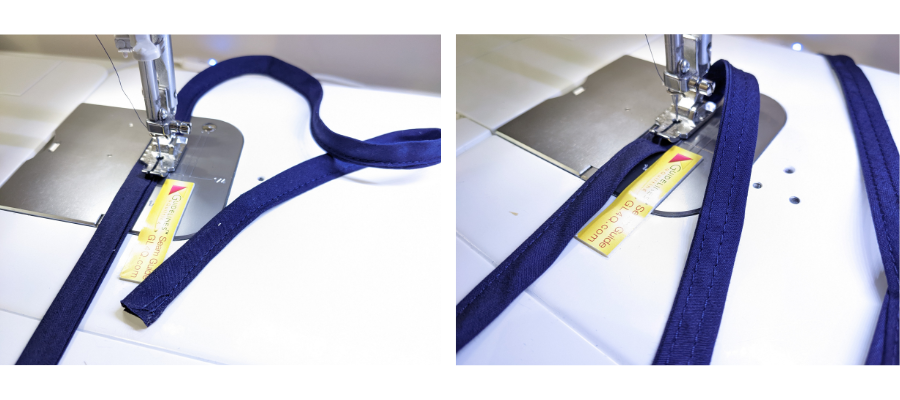
While the bag is drying, you can sew the bias tape together. If you are using ribbon, you can skip this step. Sew the tape closed along the entire length, then sew a second line of stitching along the folded edge.

Cut the ribbon for the right length to match your drawstring bag

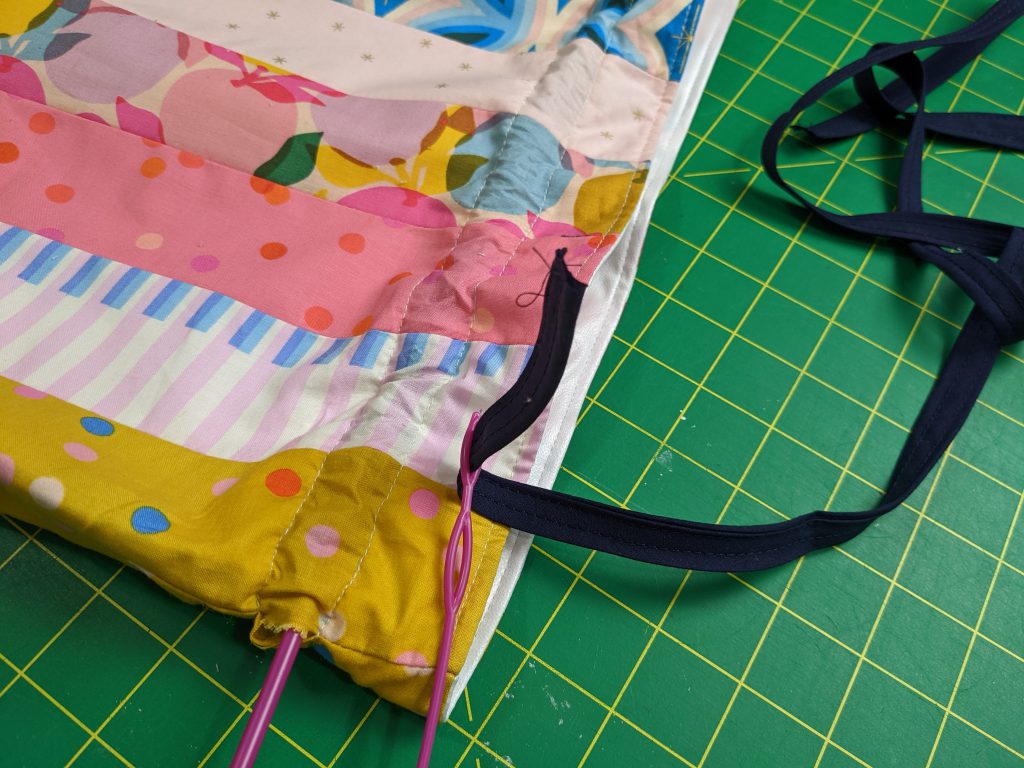
Cut the ribbon or bias tape into two equal lengths. If you have a drawstring threader, use it to thread one of the pieces through one channel, then round the back and through the second channel until both ends meet. If you don’t have this tool, you can attach a safety pin to one end and gradually feed it through by feeling along the channel with your fingers.

Knot the ends of your drawstring bag string

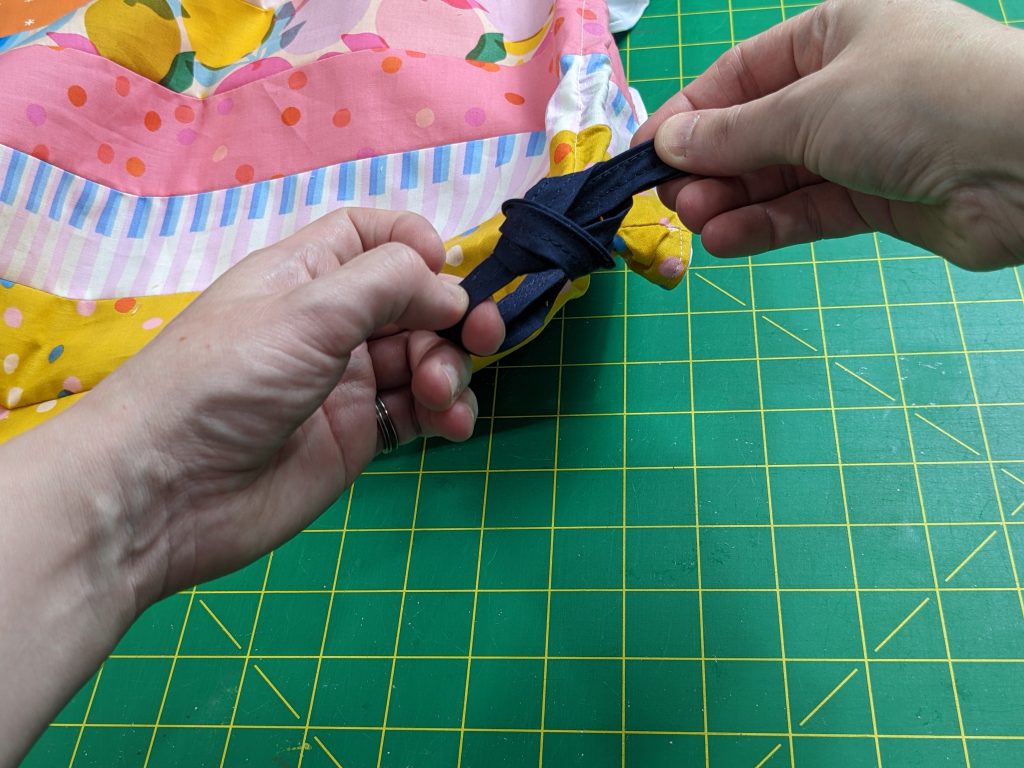
Knot the two ends together to secure. Repeat on the other side of the bag with the remaining bias tape strip.

Apply fray check to your drawstring bag

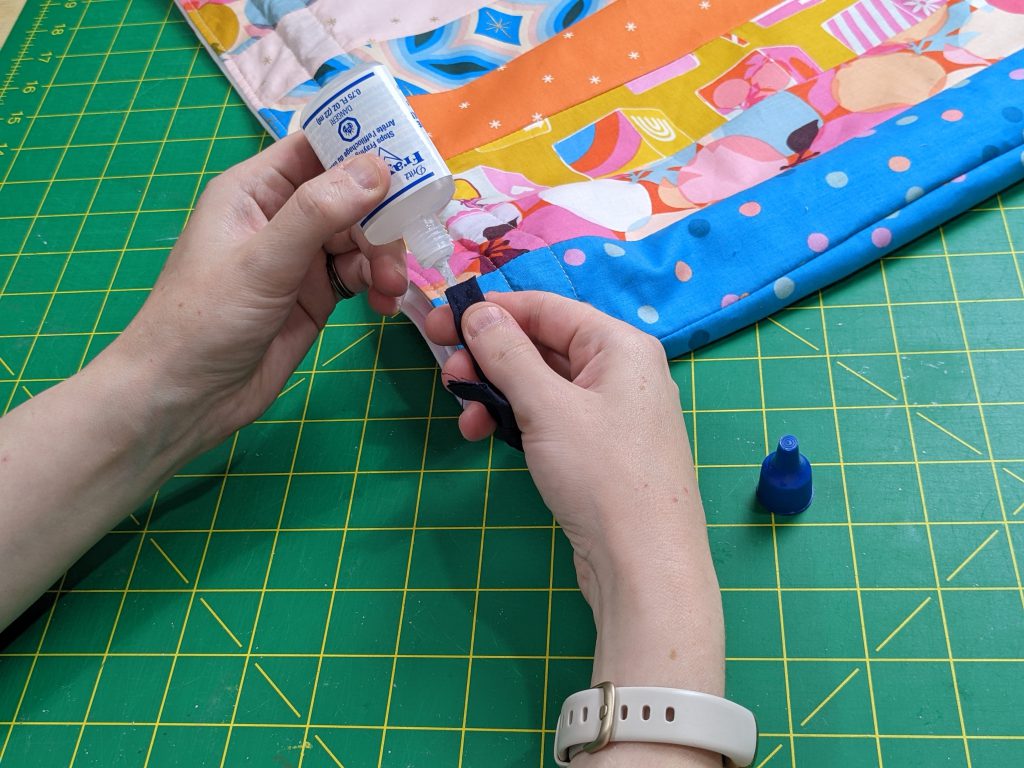
Apply Fray Check to the ends of the cord and you’re done. You’re ready to fill the bag with whatever you wish!


Admire and enjoy your new bag! Then post your creation to inspire others — and when you do, tag us on Instagram or Facebook so we can see and celebrate your design! #TrendTexFabrics @trendtexfabrics

Shop Fabric from Moda

    Share
    1

    Related posts

    Quick and Easy Easter Egg Hunt Bags Tutorial
    March 14, 2023

    Quick and Easy Easter Egg Hunt Bags Tutorial


    Read more
    March 1, 2023

    Easter Bunny Cushion Tutorial


    Read more
    Batik Table Runner Tutorial
    February 17, 2023

    Batik Table Runner Tutorial


    Read more

    Comments are closed.

    Search

    About us

    TrendTex is the leading Wholesale Distributor in Canada for independent retailers focused on the quilting and home sewing markets.

    Categories

    • Featured Designers
    • Projects & Inspiration

    Archives

    Similar Articles

    • Quick and Easy Easter Egg Hunt Bags Tutorial
      Quick and Easy Easter Egg Hunt Bags Tutorial
      March 14, 2023
    • Easter Bunny Cushion Tutorial
      March 1, 2023
    • Batik Table Runner Tutorial
      Batik Table Runner Tutorial
      February 17, 2023
    • Lucky Clover Mug Rug
      Lucky Clover Mug Rug Tutorial
      January 30, 2023
    • notebook cover tutorial
      Notebook Cover Tutorial
      January 13, 2023
    • Valentine’s Heart Decoration Tutorial
      Valentine’s Heart Decoration Tutorial
      January 6, 2023
    • Hexie Pincushion Tutorial
      Hexie Pincushion How-To
      December 5, 2022
    • Drawstring Bag
      Drawstring Bag Tutorial
      November 4, 2022
    • Stocking by the fireplace
      Christmas Stocking Tutorial with Shannon Cuddle Fabric
      October 26, 2022
    • Reusable baby wipes
      Handmade Baby Projects Tutorials
      October 12, 2022
    • Reusable baby wipes
      Baby Tutorial: Reusable Baby Wipes
      October 8, 2022
    • No-scratch baby mittens
      Baby Tutorial: No-Scratch Baby Mittens
      October 3, 2022
    • Baby burp cloth
      Baby Tutorial: How to Make a Baby Burp Cloth
      September 14, 2022

    TRENDTEX RETAIL PARTNER PROGRAM

    TrendTex is proud to partner with Canadian quilt shops. A portion of the proceeds from each purchase you make at shop.trendtexfabrics.com will be shared with the Canadian quilt shop of your choice. At checkout, simply select the retail store you want to support and leave the rest to us. Thank you for supporting Canadian quilt shops!

    ACCOUNTS AND ORDERS

    • My Account
    • Order Tracking
    • My Shopping Cart
    • My Profile
    • My Purchase Lists

    CUSTOMER SERVICE

    • FAQ’s
    • About Us
    • Contact Us
    • Locations
    • Spring 2020 Releases

    INSPIRATION

    • Articles
    • Events

    TRENDTEX FABRICS INC.

    1317 Kebet Way
    Port Coquitlam BC
    Canada V3C 6G1

    1.800.667.9448
    604.941.4620
    mail@trendtexfabrics.com

    © TrendTex Fabrics Library. All Rights Reserved.